Print Packets
A Print Packet is a group of forms to be printed by copy type. ATX™ 2014 provides four print packets: Filing Copy, Preparer Copy, Client Copy, and Custom Copy. Each packet can be customized and customizations can be saved. The Custom Copy packet allows users to fully customize one packet.
To access the Print Packets dialog box, do one of the following:
- From the Return Manager, click the Returns menu; then, select Print Packets.
- From an open return, open the Print Return Dialog Box by clicking the Returns menu and then selecting Print Return. From the Print Return Dialog Box, click the Print Packets link (bottom right of dialog box).

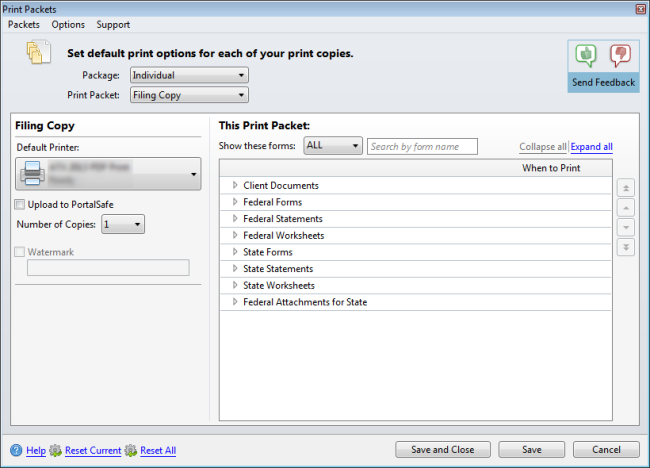
Print Packets dialog box
To edit Print Packets:
Print Packets settings for each copy type will be used as the default settings for each copy type when printing a return. If you are printing an open return, these settings may be changed in the Print Return Dialog Box without affecting Print Packets settings. See Printing Returns.
- Select the desired package in the Package drop-down list (default is Individual).
- Select which print packet you wish to edit in the Print Packet drop-down list (default is Filing Copy).
- Select which printer to use as default (for each copy type) under Default Printer.
- Select the Upload to PortalSafe check box for a particular copy type if you want that copy type to always be uploaded to PortalSafe™.
By default, your computer's default printer will be selected. This can be changed for any or all copy types desired.
- Select the number of copies you wish to print (for the specified copy type) in the Number of Copies drop-down list (default is 1).
- Select Watermark and enter the desired text to print a custom watermark on all forms (default watermark is CLIENT COPY).
The Watermark feature is disabled for Filing Copy.
Watermarks will not be printed on client documents such as billing invoice and client letter.
- Under This Print Packet, select which forms to show (default is ALL).
To search for a particular form by name, enter the form name in the Search by form name box. Results will be narrowed by the text entered and each header label that contains forms that correspond with the criteria entered will be expanded to show the forms matching the entered criteria.
- To expand all header labels, click the Expand All link. Conversely, to collapse all header labels, click the Collapse All link.
To expand individual header labels, click the  to the immediate left of the desired label.
- When the header label(s) are expanded, the setting for each listed form is shown under When to Print. To change the setting, select the desired form and then select the desired setting in the drop-down list. Available selections are Default, Always, and Never.
These settings are specific to each copy type.
- Do one of the following:
- Click Save and Close to save settings and close the Print Packets dialog box.
- Click Save to save settings and leave the Print Packets dialog box open.
- Click Cancel to abort.
The Save and Close and Save buttons will remain unavailable until changes are made.
To change the print order for the selected copy type:
By default, forms will print in the order shown in the Print Packets dialog box. Only forms used in the return will be printed.
- Expand the desired header label and select the form you wish to reorder.
Header labels may also be reordered by selecting the desired header label rather than expanding it.
- Do one of the following:
See the table below for clarification on buttons, functions, and shortcut keys.
- Click the appropriate arrow button to move the form up or down in the print order.
- Right-click the selected form (or header label) and select Move up, Move down, Move to top, or Move to bottom.
- Use the appropriate shortcut key combination to move the form to the desired location.
- Repeat as necessary for each form (or header label) and each copy type.
|
Button |
Function/Right-Click Selection |
Shortcut Keys |
|---|---|---|
|
|
Move to top |
Ctrl+Shift+Up |
|
|
Move up |
Ctrl+Up |
|
|
Move down |
Ctrl+Down |
|
|
Move to bottom |
Ctrl+Shift+Down |
To reset print packets to program defaults, do one of the following:
- Click Reset Current to reset the current selected Print Packet to default settings.
- Click Reset All to reset all Print Packets to default settings.
See Also:


